A WordPress site is not its theme, its plugins, or its content. It’s the stack underneath: the operating system, the web server, the PHP runtime, the database, and the application code that ties them together. Skip the server layer and any WordPress security plugin you install is a band-aid over a kicked-in door. Get the server right and the application layer becomes the last 20% of work, not the first 80%.
I run this WordPress server security pass on every site I take into management. About half of it is server-level: SSH, firewall, intrusion detection, automatic updates. The other half is WordPress-specific: XML-RPC, file permissions, security headers, 2FA, and the small set of plugins worth running. None of it is exotic. All of it is the difference between a site that gets defaced once a quarter and one that stays quiet for years.
This is the long version. If you only have an hour, do the server baseline and the .htaccess rules and come back for the rest. If you have a weekend, work through the whole thing. The order matters: server first, WordPress second, plugins last.
Why the server matters more than the plugin
Most “WordPress got hacked” stories I’ve audited fall into one of two buckets. Either the underlying server was already compromised (root SSH still enabled, no firewall, ancient PHP) and WordPress was just the visible casualty, or a vulnerable plugin gave the attacker a shell and the unhardened server let them pivot. In both cases, a single security plugin would not have helped.
The server is the boundary. Once an attacker is on the box, every WordPress hardening rule you wrote is something they can edit. wp-config.php is just a file. The .htaccess rules are just text. DISALLOW_FILE_EDIT is a constant any shell can flip. The hardening at the application layer is meaningful only when it sits on top of a server that strangers can’t get into.
That’s why this guide starts with the server. It’s also why I’ll repeat the point any time it’s relevant: a hardened WordPress install on an unhardened VPS is a costume, not a defence.
Picking a server provider that doesn’t fight you
Server reputation is the first thing I check before I sign up anywhere. A VPS provider that sells servers to anyone with a stolen credit card ends up with an IP space full of spam-listed addresses, and the first time you spin up a fresh box you inherit whatever the previous tenant did with that IP. I’ve seen brand-new servers land on RBL blocklists within an hour of provisioning, before a single line of mail server config existed.
The criteria I use when picking a provider:
- A built-in network firewall I can configure before the OS even boots
- Free DDoS protection at the edge, not “available as an add-on for €X/month”
- Backups that run while the server is online (no power-off requirement)
- Full disk snapshots, restorable in minutes
- At least 1 Gbit network with a sane traffic quota
- Console access for when I lock myself out of SSH (it happens)
- Below-50% Scamalytics reputation score on the IP range, which I check before I order
The big-name providers are not all equal here. Some of them sell to anyone, the IP reputation is poor, and you’ll spend the first day of every new server filing reports to remove your IP from blocklists you never asked to be on. Others vet customers properly, run their own datacentres, and the IP space stays clean. Pick the second category. I won’t recommend a specific provider in this guide because the right choice depends on your geography and budget, but the test is simple: pull the provider’s announced IP space, check it on Scamalytics, and walk away if more than half of it shows fraud risk above 50%.
The other reason this matters is GDPR. If your customers are in the EU, hosting in EU jurisdictions is the path of least friction. US-only providers can be made compliant, but the paperwork is real and the risk of a regulator picking up the phone in 2026 is not zero.
The server baseline you cannot skip
Before any of the WordPress-specific work starts, the underlying VPS needs five things in place. I’ve written the long-form version of this elsewhere; if you haven’t done it yet, stop here and read Linux server security fundamentals first. The short version:
- SSH key authentication only. Generate a 4096-bit RSA key on your laptop, copy the public half to the server, and disable password authentication in
/etc/ssh/sshd_config. - Non-root sudo user. Create a regular user, add it to the
sudogroup, and disable root SSH (PermitRootLogin no). - UFW with default-deny inbound. Allow 22, 80, 443. Lock 22 down further to your office or VPN IP if you have a static one.
- Unattended-upgrades for security patches. Run
sudo dpkg-reconfigure -plow unattended-upgradesand accept the defaults. The server now patches itself overnight. - CrowdSec on top of the firewall. Watches your auth log, your Nginx access log, and the WordPress login flow, then bans offenders at the kernel via the firewall bouncer. The full walkthrough is at CrowdSec installation and server protection, and the WordPress-specific bouncer is at CrowdSec WordPress integration.
That’s the baseline. Five steps, an hour of work the first time, fifteen minutes from the second server onward. Anything you stack on top is meaningful precisely because the baseline is in place.
Cloud control panels: useful, not a substitute
A managed control panel (RunCloud, Gridpane, ServerAvatar, CyberPanel, Enhance) can take a chunk of this work off your plate. They wire up SSH keys through their UI, configure nginx or OpenLiteSpeed sensibly, install fail2ban or CrowdSec, manage SSL renewals, and give you a dashboard for backups. For a non-sysadmin running ten WordPress sites, the time saved is real.
What they don’t do is replace the server hardening checklist. Most panels ship with sensible defaults, but they also leave decisions to you: which ports to whitelist, whether to install CrowdSec, how to scope the panel’s own service port, what to do about the IP reputation of the box. The panel is a tool, not a guarantee.
A few notes from running multiple panels over the years:
- If a panel locks you to WordPress only, you’ll regret it the first time a client asks for a Laravel app or a Statamic site. Pick a panel that lets you deploy arbitrary PHP and Docker.
- If the panel’s firewall integrates poorly with CrowdSec (some panels still ship fail2ban as a hard dependency and complain when it’s removed), open a support ticket before you migrate. Some teams will work with you. Others won’t.
- Service ports the panel itself uses to talk to the server should be locked down to the panel’s published IP range, not left open to the world. Check the panel’s documentation; they all publish their addresses.
- For CyberPanel specifically, the OpenLiteSpeed stack is fast and free, the GDPR story is whatever your hosting provider’s is, and the deployment is well-documented.
If you’re picking a panel for the first time, my rule of thumb is: pay for support, don’t pay for licences. The panel itself should be cheap. The expertise to fix things at 3am is the part you actually need.
Securing SSH, root, and shell access
The principle of least privilege is the easiest security idea to nod at and the hardest to actually enforce. On a fresh WordPress server, the rule is simple: nobody logs in as root after the initial setup. The root SSH login is disabled, day-to-day work happens as a sudo user, and shell access is restricted to people who genuinely need it.
The mechanics, if you haven’t already done them:
# Create the sudo user
adduser yourusername

# Grant sudo
usermod -aG sudo yourusername

# Copy your public key into the user's authorized_keys
su - yourusername
mkdir -p ~/.ssh
nano ~/.ssh/authorized_keys
# paste the contents of id_rsa.pub from your laptop
chmod 700 ~/.ssh
chmod 600 ~/.ssh/authorized_keys
exit

# Edit sshd_config to disable root login and password auth
sudo nano /etc/ssh/sshd_config
In sshd_config, set:
PermitRootLogin no
PasswordAuthentication no
PubkeyAuthentication yes
Then reload the SSH daemon and verify in a second terminal before you log out of the first one:
sudo systemctl reload sshdIf the new sudo user can SSH in with the key and run sudo whoami to get root, you’re done. The rule everyone learns the hard way: never log out of your existing root session until the new user can log in and run sudo. Locking yourself out of a fresh VPS is a thirty-second mistake that takes thirty minutes of console-recovery to fix.
Developer access without giving away root
For team members, contractors, and clients who need shell access but don’t run the server: create a regular user without sudo. They can SSH in, manage their own files, restart their own application processes (with systemctl --user if you set that up), and never touch the parts of the system they don’t own.
If they need to run a specific privileged command (restart a particular service, edit a particular config), grant that one command in /etc/sudoers.d/ rather than dropping them in the sudo group. The syntax is:
yourusername ALL=(ALL) NOPASSWD: /bin/systemctl restart nginxThat gives them exactly that one command, nothing else. It’s the difference between handing someone a key to your house and handing them a key to your front door’s deadbolt.
Malware scanning and routine audits
Two tools earn their slot on every WordPress server I manage. Neither is a real-time defence, both are routine hygiene.
ClamAV for weekly malware scans of the document root. The signature database is decent for the well-known WordPress shell families (WSO, b374k, FilesMan and friends), and a cron job that runs clamscan --infected --recursive /var/www/ on Sunday morning catches most of the obvious cases. False positives happen, but the cost of a five-minute investigation once a month beats finding a five-month-old shell during a forensic post-mortem.
sudo apt install clamav clamav-daemon -y
sudo freshclam
sudo clamscan --infected --recursive /var/www/
Lynis for system audits. It’s the OSS auditing tool I’ve recommended for years; it walks the system, checks dozens of hardening categories, and gives you a hardening score out of 100. The first run on a fresh server usually scores in the 60s. After applying the audit’s recommendations, getting it to 85+ takes an afternoon. Anything above 90 is well-hardened by Lynis’s standards.
sudo apt install lynis -y
sudo lynis audit system
I run Lynis quarterly on every managed server. The report is long; skim the warnings, prioritise anything tagged red, and ignore the suggestions that don’t fit your workload (Lynis sometimes pushes hardening that’s overkill for a single-tenant web host).
Hardening WordPress at the application layer
This is the half of the guide most people skip to first. With the server baseline in place, the WordPress-specific rules close the gaps the OS layer doesn’t see: the application-level patterns the kernel can’t recognise, the file-permission decisions only the web server cares about, and the headers the browser respects but the firewall doesn’t.
The rules below assume an Apache, LiteSpeed Enterprise, or OpenLiteSpeed stack with .htaccess enabled. Pure-Nginx hosts apply the same rules in the server block; I’ll note the equivalents where they matter.
Block XML-RPC
xmlrpc.php is the most-attacked endpoint on a generic WordPress install in 2024. Brute-force amplification (one POST, hundreds of login attempts), pingback DDoS abuse, and a long history of plugin vulnerabilities all flow through it. The legitimate use cases (Jetpack on older versions, certain mobile apps, pingback-driven workflows) are rare enough that I disable it by default and re-enable for the specific integration on the rare occasion something needs it.
In .htaccess:
# Block WordPress xmlrpc.php requests
<Files xmlrpc.php>
    Require all denied
</Files>
If a specific integration needs XML-RPC, allow only its IP:
<Files xmlrpc.php>
    Require ip 203.0.113.42
</Files>
For PHP-side blocking (works regardless of web server):
add_filter( 'xmlrpc_enabled', '__return_false' );I prefer the .htaccess version because it stops the request at the web server, before PHP even spins up. The PHP filter still lets the request burn a worker.
Forbid PHP execution in /wp-content/uploads/
Every shell I’ve ever pulled out of a compromised WordPress site lived in /wp-content/uploads/ or one of its subdirectories. Plugins write images and PDFs there, themes drop cached assets, attackers drop .php files disguised as .jpg. There is no legitimate reason for any user-uploaded file in that directory to be executable PHP.
Drop a .htaccess file inside /wp-content/uploads/:
<Files *.php>
    Require all denied
</Files>
This is one of the highest-leverage rules in this guide. The number of WordPress compromises this single rule prevents is genuinely surprising once you start auditing servers. Most uploaded-shell exploits assume the upload directory will execute PHP. Take that assumption away and a large category of payloads stops working.
Disable directory browsing
Drop this in the root .htaccess:
Options -IndexesWithout this, requesting a directory that has no index.html or index.php returns the directory listing. Attackers use this to enumerate what’s installed, find backup files developers left behind, and locate the obscure paths plugins write to. With Options -Indexes, the directory listing returns 403 instead.
Turn off pingbacks
Pingbacks have been a DDoS amplification vector for over a decade. WordPress’s default is to allow them, and the default is wrong for almost every modern site. Turn them off in three places: future posts, existing posts, and self-pingbacks within your own site.
Future posts: in Settings → Discussion, uncheck Allow link notifications from other blogs (pingbacks and trackbacks) on new articles.
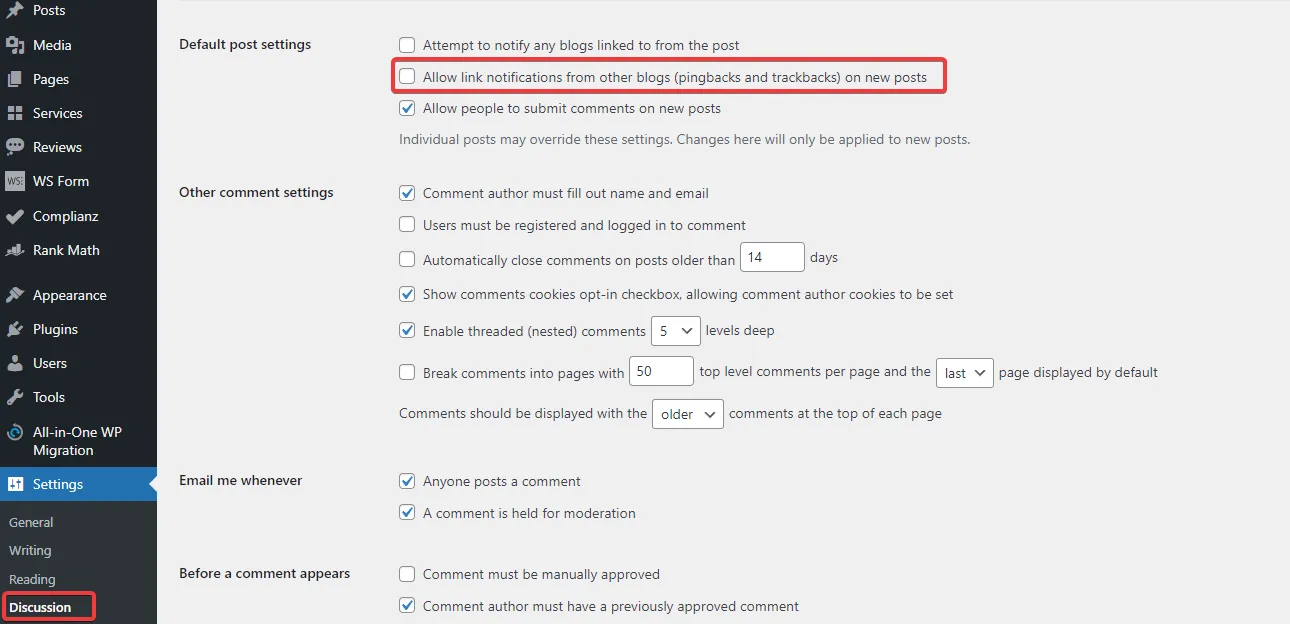
The two checkboxes most WordPress sites should have unchecked. Pingbacks have been an amplification vector for over a decade and the legitimate use case died around 2014.
Existing posts: Posts → All Posts, set Screen Options to display 200 per page, select all, choose Edit under Bulk Actions, set Pings to Do not allow, and apply. Repeat per page until done.
Self-pingbacks: in functions.php or via a code snippet plugin:
function stop_self_ping( &$links ) {
    $home = get_option( 'home' );
    foreach ( $links as $l => $link ) {
        if ( 0 === strpos( $link, $home ) ) {
            unset( $links[$l] );
        }
    }
}
add_action( 'pre_ping', 'stop_self_ping' );
This stops the noise where WordPress pings itself every time a new internal link is added.
Disable file editing in the dashboard
The theme and plugin editors in wp-admin are a foothold attackers love. If they get a single admin session (stolen cookie, reused password, session-fixation bug), the editor lets them write arbitrary PHP into the live site without ever touching the filesystem from outside.
Add this to wp-config.php, above the That's all, stop editing! line:
define( 'DISALLOW_FILE_EDIT', true );Use SFTP, the panel’s file manager, or WP-CLI for legitimate edits. Removing the editor surface costs you nothing and closes a real attack path.
Block author scans
?author=1 is the oldest username-enumeration trick in the WordPress book. The default behaviour is to redirect to the author archive at /author/<username>/, which leaks every login name on the site. Brute-force scripts harvest those names and hammer wp-login.php with them.
In .htaccess:
# Block author scans
RewriteEngine On
RewriteBase /
RewriteCond %{QUERY_STRING} (author=\d+) [NC]
RewriteRule .* - [F]
Or via PHP:
function block_author_scans( $redirect, $request ) {
    if ( preg_match( '/\?author=([0-9]+)/', $request, $matches ) ) {
        if ( (int) $matches[1] ) {
            wp_redirect( home_url(), 301 );
            exit;
        }
    }
}
add_filter( 'redirect_canonical', 'block_author_scans', 10, 2 );
Either approach kills the enumeration. The .htaccess version is cheaper at the server level; the PHP version is portable across web servers.
Block direct access to sensitive files
A .htaccess block in the document root that denies direct access to the files attackers go looking for:
# Block access to wp-config.php
<Files wp-config.php>
    Require all denied
</Files>

# Block access to .htaccess
<Files .htaccess>
    Require all denied
</Files>

# Block access to .htpasswd
<Files .htpasswd>
    Require all denied
</Files>

# Block access to readme.html, license.txt, install.php
<FilesMatch "^(readme\.html|license\.txt|install\.php)$">
    Require all denied
</FilesMatch>

# Block access to backup, log, swap, and SQL files
<FilesMatch "\.(bak|log|swp|sql|sql\.gz|tar|tar\.gz|zip)$">
    Require all denied
</FilesMatch>
The backup-file regex is the one I add to every site. Developers leave wp-config.php.bak and database-backup.sql.gz behind constantly, and the WordPress security scanners that probe public sites look for these names by default. Deny direct access at the web server level and the casual probe gets a 403, regardless of whether someone left a backup file lying around.
Warning: Edit
.htaccesscarefully. A typo in any of these blocks can take the whole site offline. Always have an SFTP session ready to revert before saving.
Configure security keys and secure cookies
WordPress security keys (AUTH_KEY, SECURE_AUTH_KEY, LOGGED_IN_KEY, NONCE_KEY, plus their salts) sign cookies and nonces. If they’re left at the WordPress installer’s defaults, every cookie your site issues is forgeable by anyone with the same defaults. Generate a fresh set:
Visit https://api.wordpress.org/secret-key/1.1/salt/, copy the output, paste it into wp-config.php over the existing keys block. Refresh the page to generate a new set; rotate them every six to twelve months on production sites. Rotating logs everyone out (the existing cookies stop validating), so do it during a low-traffic window.
While you’re in wp-config.php, add the cookie security flags:
@ini_set( 'session.cookie_httponly', true );
@ini_set( 'session.cookie_secure', true );
@ini_set( 'session.use_only_cookies', true );
@ini_set( 'session.cookie_samesite', 'Strict' );
These four lines set:
HttpOnly: client-side JavaScript cannot read the cookie. Closes most XSS-driven session theft.Secure: the cookie only travels over HTTPS. On a TLS-only site this is a defence against accidental HTTP downgrade.use_only_cookies: session IDs only flow through cookies, never URLs.SameSite=Strict: the cookie isn’t sent on cross-site requests. Closes most CSRF.
SameSite=Strict is occasionally too aggressive for sites that link out and back (a checkout flow that bounces through PayPal, for example). If a legitimate flow breaks, drop to Lax rather than removing the directive.
Database prefix (only at install time)
Changing the WordPress database prefix from the default wp_ is a low-impact hardening step that only works if you do it during the initial install. Plugins that swap the prefix on a live site cause more bugs than they prevent (every query, every plugin’s expectations, every migration script assumes the prefix). Set a custom prefix in wp-config.php before you run the WordPress installer; ignore the topic on existing sites.
File permissions
The recurring permission mistake on inherited WordPress sites is files owned by root after a developer ran an install command as root and never changed ownership. The web server then can’t write to /wp-content/uploads/, plugin updates fail silently, and someone eventually fixes it by chmod 777-ing the whole document root. Don’t be that person.
The right ownership on a site running under the web server user www-data:
sudo chown -R www-data:www-data /var/www/yoursite
sudo find /var/www/yoursite -type d -exec chmod 755 {} \;
sudo find /var/www/yoursite -type f -exec chmod 644 {} \;
sudo chmod 600 /var/www/yoursite/wp-config.php
Directories at 755, files at 644, wp-config.php locked down to 600. The web server can read and write where it needs to, the world cannot read wp-config.php, and plugin updates work without manual intervention.
Security headers — the browser does the work for free
HTTP security headers are the highest leverage-per-byte hardening you can apply to a WordPress site. They cost nothing in CPU, they cost nothing in latency, and they tell every visitor’s browser to refuse a long list of attack patterns. Skipping them is leaving a free defence on the table.
Here’s the header set I run on every production WordPress site, with the .htaccess form. For Nginx, translate Header set X "Y" to add_header X "Y" always; inside the server block.
Content-Security-Policy
<IfModule mod_headers.c>
    Header set Content-Security-Policy "upgrade-insecure-requests;"
</IfModule>
upgrade-insecure-requests is the safe-everywhere CSP directive. It tells the browser to silently upgrade any HTTP resource references to HTTPS before fetching them, killing mixed-content warnings without breaking embedded content. A full CSP that whitelists allowed script and style sources is more powerful, but it also takes weeks of CSP-violation-report tuning per site. Start with upgrade-insecure-requests; build a stricter policy site-by-site when you have time.
Strict-Transport-Security
<IfModule mod_headers.c>
    Header set Strict-Transport-Security "max-age=63072000; includeSubDomains; preload"
</IfModule>
HSTS tells browsers to refuse HTTP for the next two years, including all subdomains. It defeats SSL stripping and the user-typed-the-URL-without-https class of downgrade. Once the header has been live for a few weeks and the site definitely works on HTTPS for everyone, submit the domain to the HSTS preload list so browsers ship with HTTPS-only behaviour for it baked in.
Warning: HSTS with a long max-age is sticky. Don’t enable it on a domain you might want to serve over HTTP again, and don’t enable
includeSubDomainsuntil you’ve confirmed every subdomain has a valid certificate. Reverting takes weeks because browsers cache the directive locally.
X-Content-Type-Options
<IfModule mod_headers.c>
    Header set X-Content-Type-Options "nosniff"
</IfModule>
Tells the browser to trust the Content-Type header the server sends and not “sniff” the bytes to guess a different MIME type. Closes a category of attacks where a malicious file uploaded as image.jpg gets executed as something else.
X-Frame-Options
<IfModule mod_headers.c>
    Header set X-Frame-Options "SAMEORIGIN"
</IfModule>
Prevents your site from being embedded in an iframe by anyone except yourself. Closes most clickjacking. Use DENY instead of SAMEORIGIN if you never legitimately frame your own site.
Permissions-Policy
<IfModule mod_headers.c>
    Header set Permissions-Policy "microphone=(), camera=(), fullscreen=*, payment=self"
</IfModule>
Disables access to the microphone and camera APIs site-wide, allows fullscreen everywhere, and restricts the Payment Request API to the site’s own origin. Adjust per site: a video-call app obviously needs camera and microphone allowed; a marketing brochure does not.
Referrer-Policy
<IfModule mod_headers.c>
    Header set Referrer-Policy "strict-origin-when-cross-origin"
</IfModule>
When a user navigates from your site to another site, only the origin (scheme + host + port) is sent as the referrer, not the full URL. Same-origin navigation still sends the full URL. HTTPS-to-HTTP navigation sends nothing. The default in modern browsers is already close to this, but setting it explicitly closes the gap on older clients.
Cross-Origin-* headers
<IfModule mod_headers.c>
    Header set Cross-Origin-Embedder-Policy "require-corp"
    Header set Cross-Origin-Opener-Policy "same-origin-allow-popups"
    Header set Cross-Origin-Resource-Policy "cross-origin"
</IfModule>
These three close the Spectre / side-channel category of cross-origin attacks. COEP: require-corp forces every cross-origin resource on the page to explicitly opt in. COOP: same-origin-allow-popups isolates the browsing context from cross-origin windows but allows your own popups. CORP: cross-origin lets your resources be loaded from anywhere, which is right for assets you want CDNs to serve.
If COEP: require-corp breaks something (third-party widgets that don’t send Cross-Origin-Resource-Policy headers will fail to load), drop it to unsafe-none and revisit when the third party fixes their headers.
Verifying the header set
Once the headers are deployed, test them with a free third-party scanner. The two I use:
- securityheaders.com — quick A-to-F grade, easy to share with clients.
- observatory.mozilla.org — more detail, includes TLS configuration grading.
Both should grade an A or A+ once the full set above is live. If either drops to B or lower, the report will tell you which header is missing.
Two-factor authentication and login hardening
Weak passwords are responsible for around 70% of WordPress compromises in the postmortems I’ve seen. Reused passwords from leaked dumps account for most of the rest. The fix is not “force users to pick stronger passwords” (they’ll pick the same eight characters with a 1! on the end and reuse it on every site they own); the fix is two-factor authentication on every account that touches wp-admin.
The 2FA stack I use:
- A 2FA plugin on wp-admin. The Wordfence built-in works well if you’re already using Wordfence for other reasons. The standalone Two Factor plugin from the WordPress core team works on plain installs. Either gets you TOTP-based 2FA on every login.
- Enrolment forced for admins, encouraged for editors. Don’t let the highest-privilege account on the site skip 2FA because it’s “convenient.”
- A 2FA token manager like the one I’ve documented at 2FAuth self-hosted 2FA manager so the codes don’t end up exclusively in one phone that can be lost or stolen.
- A leaked-password check that prevents users from picking passwords known to be in public breach databases. Wordfence does this; if you’re not running Wordfence, the Have I Been Pwned WordPress plugin or the API integration in your auth code does the same job.
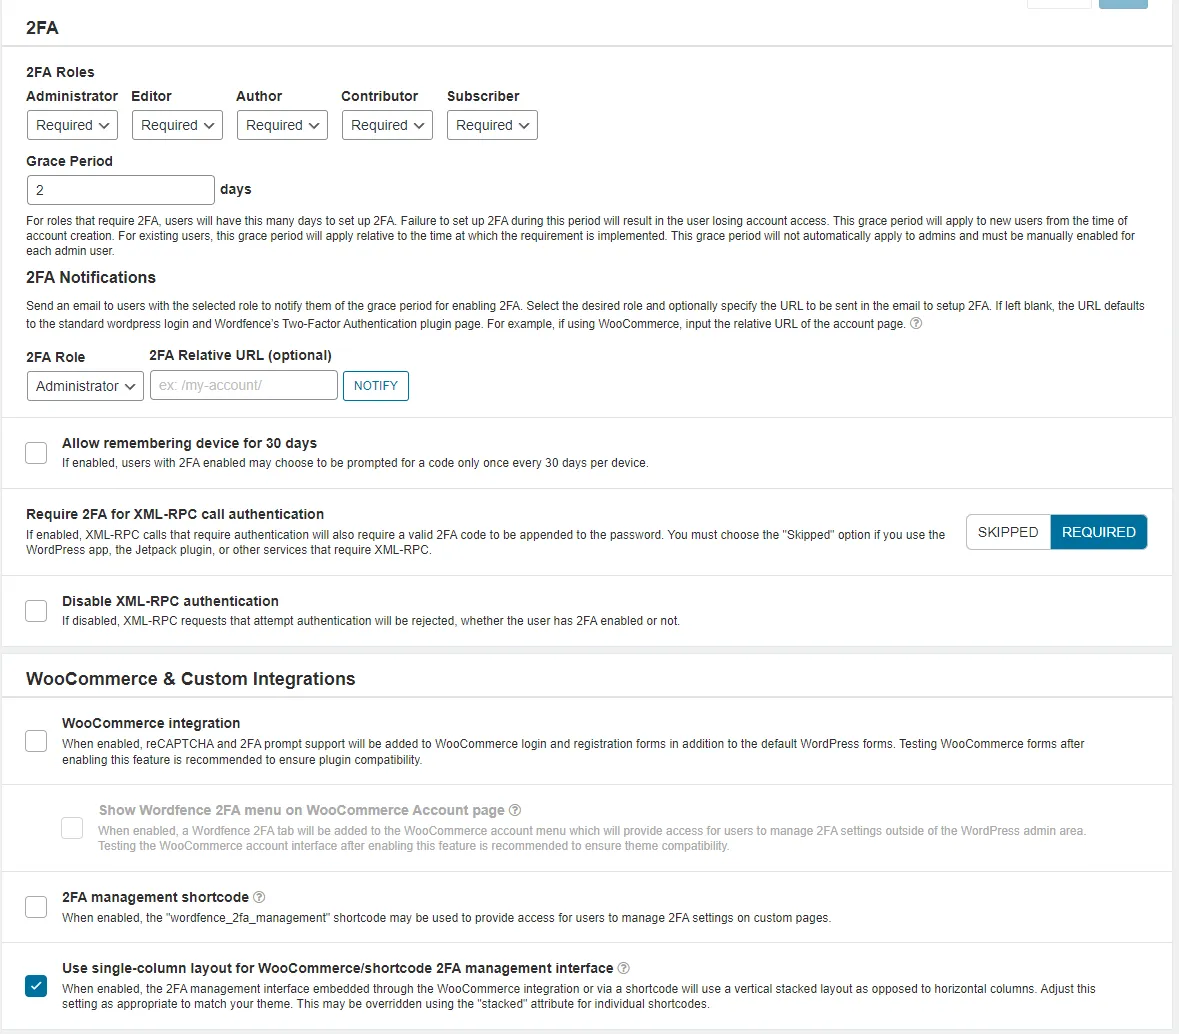
Role-based 2FA enforcement. Admins are required, editors get a grace period, lower-privilege roles can opt in. Defaults like this make the rollout enforceable without breaking everyone’s workflow at once.
For agency setups with multiple staff and shared logins (please don’t share logins, but I know it happens), an SSO layer is worth the setup time. Authentik is the self-hosted IdP I use for this; one set of credentials, one 2FA enrollment, one place to revoke access when someone leaves.
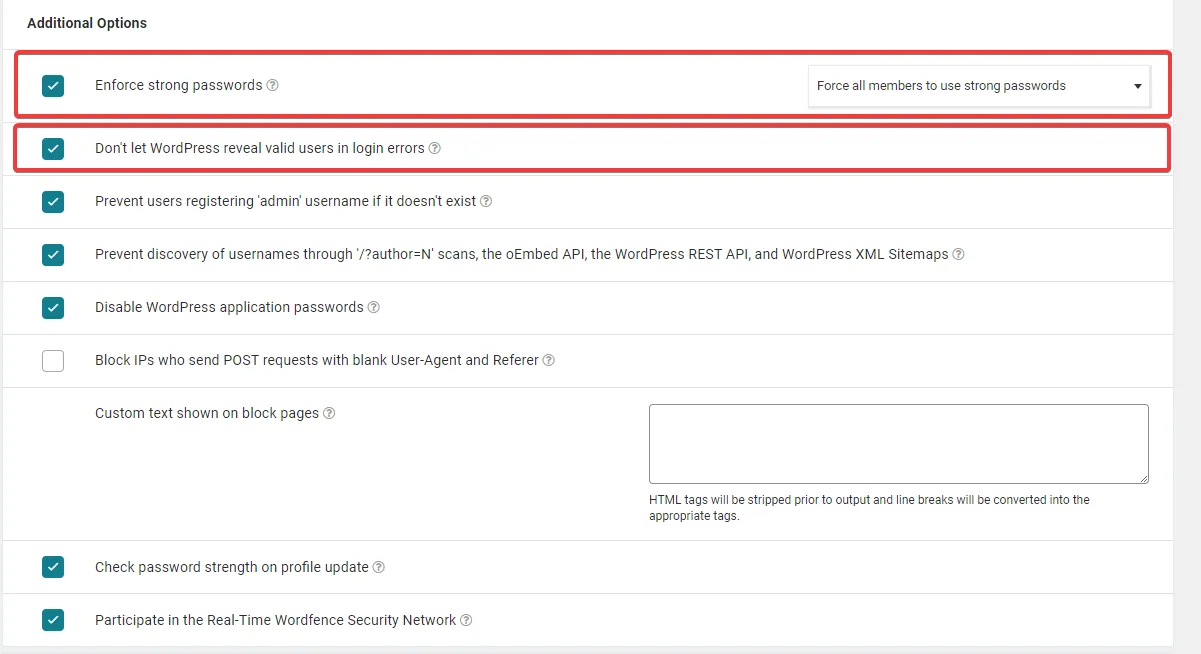
Leaked-password lookup at login. The user typed a password that’s in a public breach dump, and the plugin refuses to let them sign in until they pick something new. This is the single most effective password policy I’ve ever deployed.
If you ever lock yourself out of wp-admin (it happens; the 2FA setup gets botched, the recovery codes get lost, someone deletes the only admin account), the WordPress admin account recovery post walks through the recovery paths.
On security plugins, specifically Wordfence
I’m not generally a fan of WordPress security plugins. Most of them ship a firewall that’s redundant with anything you’d run at the server level, a malware scanner that’s slower and less accurate than ClamAV, and a marketing pitch that the plugin alone is enough. None of those claims survive contact with an actually-hardened server.
That said, I’ve come around on Wordfence. Not for the firewall (the server should be doing that), not for the malware scanner (ClamAV plus weekly Lynis covers it), but for two specific features that are genuinely hard to do otherwise:
- 2FA enforcement integrated with WooCommerce, MemberPress, and other authentication-heavy plugins. Bolting 2FA onto a membership site without breaking checkout flows is non-trivial. Wordfence handles the integrations.
- Leaked-password lookup at login time. The Have I Been Pwned API, integrated into the login flow, refusing breached passwords. This is the single highest-impact password policy I’ve deployed in the last five years.
What I don’t pay Wordfence for: the firewall, the country blocking, the live traffic view (CrowdSec’s console covers it for the whole server, not just one site), and the malware scanner. On a brochure site without WooCommerce or membership flows, I skip Wordfence entirely and use the standalone Two Factor plugin for 2FA.
The free version of Wordfence ships with a 30-day delay on threat intelligence updates. That delay matters for the firewall ruleset (which I’m not paying for anyway, since the server handles it), and matters less for the 2FA features (which work the same either way). If you do install Wordfence, the question is: are you paying for the firewall delay reduction, or are you paying for the auth features? If the answer is auth, the free version is fine. If the answer is firewall, you should be hardening the server instead.
Pricing for Wordfence Premium starts around $119/year per site, with multi-site and multi-year discounts. Compare that against the cost of a properly hardened server (one-time, a few hours) and the calculus is straightforward: if the site needs the auth features, pay for Wordfence; otherwise, the budget is better spent on server hardening and a 2FA token manager.
Backups: the layer that turns “incident” into “annoyance”
Hardening reduces the probability of a compromise. Backups reduce the cost of one when it happens anyway. A site with a recent off-site backup recovers in an hour. A site without one recovers in a week of forensic work, customer apology emails, and lost trust.
The backup setup I run on managed sites:
- Daily database dumps to local storage, retained for 7 days.
- Weekly full-site snapshots (database + uploads + themes + plugins + wp-config) to off-site storage, retained for 4 weeks.
- Monthly archive of the weekly snapshot, retained for 12 months.
- Off-site storage on a different provider from the host. If the host goes down or the account gets locked, the backup is not on the same fire.
The off-site target depends on what you have available. S3-compatible object storage (Backblaze B2, Wasabi, Hetzner Storage Box, Scaleway Object Storage) at €5–10/month per terabyte is the right shape for most agency-sized backup needs. Restic or Duplicacy as the backup tool, with encryption at rest, gets you encrypted incremental backups to whichever bucket you point it at.
The rule everyone forgets: a backup that has never been restored is not a backup. Test the restore at least once a quarter. Spin up a fresh VPS, pull the latest snapshot, restore the site, verify it loads. The first time you try this, you’ll find at least one thing the documentation didn’t mention. Better to find it during a drill than during an incident.
What I deliberately skip
A few things look tempting in security tutorials but I’ve stopped doing on agency-sized WordPress infrastructure:
- Hiding the WordPress version. Banner-grabbing tools find it anyway via the asset URLs and admin page hashes. The hour you’d spend obfuscating it is better spent updating to the latest version.
- Renaming wp-admin to a custom path. The plugins that do this break more than they protect; redirect loops, plugin compatibility issues, password reset flows that send the wrong URL. The CrowdSec WordPress collection plus 2FA is more effective and doesn’t break anything.
- Disabling REST API access globally. Modern WordPress depends on the REST API for the block editor, plugin admin pages, and a long list of internal flows. Restricting unauthenticated
usersendpoints is fine; killing the whole API isn’t. - Custom mod_security rule sets at the server level. ModSecurity with the OWASP CRS is powerful and comes with a maintenance cost no agency has time for. CrowdSec’s HTTP collections handle most of what CRS would catch, with a fraction of the false-positive triage burden.
- Daily malware scans. Weekly is plenty for an agency-managed site. The CPU cost of daily scans on ten sites adds up; the marginal detection improvement does not.
What I do add on top, depending on the workload: the CrowdSec WordPress integration for layer-7 protection, Authentik or 2FAuth for the auth layer above WordPress itself, and Cryptgeon when I need to share credentials with a client without sending them in plaintext over email.
For the broader picture of why no amount of tooling beats a careful operator, the human element in cybersecurity defense post is the companion to this one.
Closing the loop
A hardened WordPress site has three layers, in this order: a hardened server underneath, a hardened application on top of that, and a small set of plugins for the things only the application can defend against. Skip the server and the rest is theatre. Skip the application and the server hardening protects everything except the actual attack surface. Skip the plugins and you’ll do fine on a brochure site, less fine on a membership stack.
The full pass on a fresh build takes an afternoon. On an inherited site that was never hardened, budget a day. On an agency portfolio of ten sites, budget a week and never think about it again, except for the six-month re-audit that catches the drift.
The day-to-day work of running a WordPress agency gets a lot quieter when this work is done. The auth log goes silent. The “site is showing weird content” support tickets stop arriving. The forensic post-mortems become rare enough that you forget what they look like. That’s the actual goal: not zero incidents (impossible), but incidents rare enough that each one is a story, not a routine.
If you’re inheriting a WordPress site you didn’t build, run this hardening pass before you do anything else. If you’re building a new one, run it before you ship. The right time to harden a server is before the next incident, not after.